Why Is My Dremel Overheating? (Complete Diagnostic Guide)
If your Dremel feels hot after a few minutes of use, it doesn’t automatically mean something is wrong. Rotary tools like the Dremel 3000, 4000 4300 (and other models) use high-speed, low-torque universal motors that naturally generate heat during operation. The real question isn’t simply “Why is my Dremel overheating?” . It is whether it's normal operating warmth, user overload, ventilation restriction, electrical inefficiency, worn components — or a flex shaft friction issue?
In this guide, we’ll break the problem down methodically so you can diagnose the exact cause, understand the underlying mechanics, and apply the correct fix instead of guessing.
Is Your Dremel Actually Overheating — or Just Running Warm?
Before assuming there’s a fault, it’s important to understand that rotary tools like the Dremel 3000, Dremel 4000, and Dremel 4300 naturally generate heat during operation. These models use high-speed, brushed universal motors that can spin between 5,000 and 35,000 RPM to perform a wide variety of jobs. At those speeds, electrical losses, brush friction against the commutator, and internal air resistance all produce heat. It is completely normal for the housing to feel warm—even noticeably warm—after 10–20 minutes of moderate use.
A properly functioning Dremel can typically run 30–60 minutes under reasonable load without entering thermal distress, provided ventilation is unobstructed and the tool is not being overloaded.
True overheating, however, presents differently. Warning signs include a sharp burning smell (distinct from normal warm-electrical odor), excessive sparking visible through the vents, sudden loss of power, fluctuating RPM under steady load, or the housing becoming too hot to hold comfortably.
If the temperature rises dramatically within just 2–3 minutes of light cutting, that points toward overload, worn brushes, bearing friction, voltage drop, or airflow restriction—not normal operating warmth. The goal is to distinguish expected thermal behavior from abnormal heat buildup before attempting repairs or assuming the tool is defective.
There can be two scenarios of an overheating Dremel tool:
- The Dremel rotary tool itself is overheating
- The flex shaft (Dremel attachment no. 225) is overheating
We will discuss both of the above separately in this article.
Rotary Tool Motor Overheating (Not the Flex Shaft)
If the main body of your Dremel rotary tool is overheating, typical causes include mechanical overload (too much pressure applied, hard material, dull accessory, blocked airflow or worn bearings) or an electrical issue (worn carbon brushes, voltage drop from long extension cords or internal dust buildup).
Mechanical Causes
Mechanical overheating occurs when the motor is forced to work harder due to physical resistance rather than an electrical fault. In Dremel, this typically results from excessive cutting pressure, working with dense or high-resistance materials, using dull or inappropriate accessories, restricted airflow around the housing, or internal friction from worn bearings.
Each of these issues increases load on the motor armature, raises current draw indirectly, and leads to heat buildup. Let's discuss the mechanical causes of overheating one by one.
1. Excess pressure (RPM drop test)
One of the most common reasons a Dremel overheats is simple: you’re pushing too hard.
Dremel is designed to cut using speed, not force. If you lean into the material — especially during cutting or grinding — the motor has to fight against that resistance. In practical terms, the tool may feel like it’s working harder, the sound may deepen, and the housing may heat up quickly. Many users mistake slow cutting for lack of pressure, when in reality the solution is usually higher speed and lighter passes.
What actually happens scientifically is that applying excess pressure reduces the motor’s RPM. When RPM drops, the motor’s back electromotive force (back EMF) decreases, which causes the motor to draw more current from the power source i.e., your electrical socket. Higher current means greater resistive losses in the windings, and that excess electrical energy converts directly into heat.
In short: push harder → RPM drops → current increases → heat rises.
To confirm if this is the cause of your Dremel overheating, perform a simple RPM drop test. While cutting, listen carefully to the pitch of the motor. If the sound noticeably lowers when you press into the material and rises again when you ease off, you are overloading the tool. You can also try making two cuts. One with firm pressure and one using light, multiple passes. If overheating reduces significantly with lighter pressure, you’ve identified the cause.
The solution is straightforward. It is to increase speed (within accessory limits), reduce applied force, and let the abrasive or cutting edge do the work. Take multiple shallow passes instead of one deep cut.
2. Dull accessories
A dull cutting wheel, sanding drum, or engraving bit is a silent cause of overheating. When an accessory loses its sharp cutting edges or abrasive grit, it stops slicing efficiently and begins rubbing against the material instead. To the user, this often feels like the tool is “not cutting properly,” which leads to applying more pressure—further increasing heat. In reality, the motor is being forced to compensate for an accessory that is no longer removing material effectively.
To confirm if this issue is causing your Dremel to overheat, inspect the accessory visually and behaviorally. Cutting wheels that take much longer than usual to cut, sanding drums that polish instead of remove material, or engraving bits that burn wood instead of carving are strong indicators. You can also swap in a brand-new accessory and repeat the same task. If the tool runs cooler and cuts faster with light pressure, the dull accessory was the root cause.
The fix is to replace worn consumables promptly and avoid forcing a worn bit to 'last a little longer'. Rotary tool accessories are designed to be sacrificial components; using them beyond their effective life not only reduces performance but also increases motor load and overheating risk.
3. Cutting hardwood (oak, maple or walnut) or hard material
In the context of material you're trying to work with especially working with wood, not all wood behaves the same under a Dremel. Many hobbyists commonly work with softwoods like pine or basswood, which cut easily and place relatively low demand on the motor. However, hardwoods such as oak, maple, or walnut are significantly denser and offer much greater resistance to cutting. When you use a Dremel on these harder woods—especially for deep cuts or carving—the tool may feel slower, require more patience, and heat up faster than usual.
To confirm this cause, compare performance on two materials. Try making a similar cut in a softwood like pine and then in oak or maple using the same accessory and speed setting. If the tool runs noticeably cooler and maintains RPM better in softwood, but struggles and heats quickly in hardwood, the material resistance is a key contributor. Also observe whether the bit is burning the wood rather than cutting cleanly—this indicates excessive friction and insufficient chip removal.
The solution is to increase speed (within accessory limits), use sharp carbide or high-speed steel bits suitable for hardwood, take shallow passes, and avoid forcing the cut. For extensive hardwood carving, consider working in intervals to allow cooling, as Dremel rotary tools are optimized for precision work — not sustained heavy stock removal in dense materials.
4. Worn bearings
The mechanical causes of overheating we've discussed so far fall under the control of the user. Now let's look at a cause that is linked with a defect inside the Dremel itself.
Inside your Dremel, the motor’s armature shaft is supported by small precision bearings that allow it to spin smoothly at very high RPM. When these bearings wear out, lose lubrication, or develop internal play, the shaft no longer rotates freely. To the user, this may present as unusual vibration, a faint grinding noise, or a tool that feels rough rather than smooth when running. Over time, this added mechanical resistance can cause noticeable heat buildup in the housing.
Scientifically, healthy bearings minimize friction between rotating and stationary components. When they wear, friction increases significantly. That friction converts rotational energy directly into heat and also forces the motor to draw more current to maintain speed. In severe cases, bearing wear can slightly misalign the armature, increasing magnetic drag inside the motor and compounding heat generation. The result is both mechanical and electrical stress contributing to overheating.
To test for worn bearings, unplug the tool and manually rotate the collet or attached bit by hand. It should feel silky smooth and consistent, with not even the slightest grinding sensation or tight spots.
Another test is to listen to the sound of the tool during operation. A high-pitched whine is normal at high RPM, but even a slight rumbling or grinding element in the sound suggests bearing degradation.
Last but not the least, problem in the bearings can also manifest in the form of excess vibrations experienced at certain speeds.
The fix depends on your comfort level with disassembly. If you are a handyman yourself, you can replace the bearing assembly using the correct replacement parts (check Dremel 4000 bearing assembly replacement procedure here). Otherwise, a service center can perform the repair.
5. Blocked ventilation
Dremel rotary tools rely on forced air cooling to regulate internal temperature. A small internal fan mounted on the motor shaft continuously pulls air through the housing vents to remove heat generated by the windings and brushes. If that airflow is restricted for any reason, heat cannot escape efficiently and internal temperature rises quickly — even under normal load. Ventilation issues are therefore one of the most overlooked yet common causes of overheating in a Dremel.
There are two common causes of poor ventilation. Let's discuss them one by one.
Vents blocked by dust
Over time, fine dust from jobs like sanding, grinding, drywall cutting, or MDF work can accumulate inside the ventilation openings and within the motor housing. This dust buildup restricts airflow, reducing the volume of air moving across the motor windings. With less heat transfer, internal temperature rises faster than designed — even if you are not overloading the tool.
To confirm this issue, inspect the side vents with a flashlight. Visible dust accumulation or reduced airflow felt at the exhaust vents during operation are warning signs. The fix involves carefully opening the housing (if you are comfortable doing so) and cleaning the internal components using compressed air or a soft brush.
Vents blocked by poor handling or placement of the tool
Ventilation problems are not limited to dust buildup — they can also result from how the tool is positioned or held during operation.
Sometimes, users position their fingers over the side vents while holding the tool thereby restricting airflow unintentionally. Another case is when using a flex shaft, many users place the rotary tool flat on a workbench while operating the handpiece. If the housing rests directly against the table surface, one or more intake or exhaust vents may become partially or fully blocked.
When using a flex shaft, it is advisable to hang the rotary tool on a stand or tripod instead of placing over the table.
Electrical Causes
Now that we've discussed the mechanical causes of overheating, let's discuss the electrical causes also. Electrical overheating occurs when the motor draws more current than it should due to internal wear or power supply inefficiencies.
Unlike mechanical overload—where external resistance forces the motor to work harder—electrical causes originate from poor electrical contact, increased resistance, voltage drop, or internal component degradation. These issues raise internal heat even if your cutting technique is correct. Let's look at the possible electrical causes one by one.
1. Worn carbon brushes of motor
Worn out carbon brushes are one of the most common causes of Dremel overheating.
Carbon brushes are small but essential components of any rotary tool. They transfer electrical current from the stationary parts of the motor to the spinning armature. Over time, these brushes wear down from constant contact with the commutator, reducing the contact surface area. Worn brushes increase electrical resistance at the contact point which causes localized heating due to resistive losses, and the motor compensates by drawing more current to maintain speed, generating even more heat.
Under worst case scenario, excessive arcing can occur at the commutator (which may or may not be clearly visible to the user), further raising the internal temperature. Essentially, the motor is working harder electrically, even if mechanical load hasn’t changed.
Motor brushes usually last 50–100 hours, depending on how hard you push the tool. Dremel suggests checking them every 30 hours, since brushes often wear unevenly. If the carbon part of a brush is shorter than 1/8 inch, replace both to avoid damaging the motor. After installing new brushes, run the tool unloaded for 5–10 minutes to seat them properly — this helps the motor run smoother and stay cooler.
For the Dremel 3000 and Dremel 4300, replacement can be done by the user and the brushes are available in Dremel’s spare parts section. For the Dremel 4000, Dremel recommends to have a local service center handle the replacement.
2. Voltage drop from power source
Although uncommon, overheating can sometimes be linked to unstable or reduced voltage reaching the tool. Let's look at some factors that can cause this voltage drop.
Are you using a very long extension cord?
Although uncommon, one reason for your Dremel overheating could be your extension cord.
Using a long or thin extension cord can unknowingly cause your Dremel to overheat, even if you’re not applying excess pressure. As electricity travels through a wire, resistance reduces the voltage that actually reaches the tool. If the voltage drops, the motor draws more current to maintain speed, which increases internal heating.
In simple scientific terms: long thin cord → less voltage → more current → more heat.
Sometimes, users don’t realize that simply plugging the tool into a distant outlet or using a lightweight cord can create this effect.
A quick reference for safe use:
- 16 AWG cord → safe up to 50 ft for typical Dremel load
- 14 AWG cord → safe up to 100 ft
- 18 AWG cord → best kept under 25–30 ft
The fix is either to use a shorter cord, upgrade to a thicker gauge, or avoid running multiple high-load tools on the same extension. This simple adjustment can significantly reduce unnecessary motor heating.
Is your socket okay?
Overheating caused by a wall socket is generally rare but worth checking if other causes have been ruled out.
A faulty, loose, or preheated socket can cause the motor to draw extra current to maintain speed, which in turn increases internal heat. For example, if a socket has been recently used for a high-power device, like a drill or heater, the contacts and wiring can be warm. Plugging your Dremel into that same socket reduces voltage efficiency and adds stress to the motor.
To test this, try plugging your Dremel into a different outlet on a separate circuit that hasn’t been used heavily. If the tool runs cooler and maintains RPM, the original socket was contributing to overheating.
3. Dust inside the tool case
If your Dremel has been in use for several years, fine dust from sanding, grinding, or cutting can accumulate inside the Dremel’s housing, creating another source of overheating.
Unlike external vent blockage, internal dust interferes with heat dissipation from the motor and windings. The dust acts as an insulating layer, preventing efficient conduction and convection of heat through the casing. Additionally, dust particles can settle around the brushes and commutator, increasing friction and sparking, which further elevates internal temperature.
The fix involves carefully opening the tool and removing dust using compressed air, a soft brush, or vacuum designed for electronics.
4. High ambient temperature (extreme summer use)
It is important to rule out high ambient temperature also. Many users expect the tool to behave the same year-round, but environmental temperature directly affects cooling performance of even the best Dremel models. Power tools rely on surrounding air to cool the motor. When you’re working in a hot garage, outdoors in direct sunlight, or in 100°F (38°C+) weather, the tool starts off hotter and has a harder time shedding heat.
To confirm this is the cause, operate the tool in a cooler indoor space and compare behavior. If overheating reduces significantly in an air-conditioned room or during cooler hours of the day, ambient temperature is the contributing factor.
Flex Shaft Overheating (Different Problem, Different Fix)
If the handpiece or flexible cable is getting hot while the main rotary tool remains only warm, you’re dealing with a completely different issue. Flex shaft overheating is not a motor problem—it is almost always related to friction, lubrication, alignment, or cable routing.
Attachments like the Dremel Flex Shaft 225 transmit high-speed rotation through a coiled inner cable, and any increase in internal drag can quickly generate heat. Because the mechanism is mechanical rather than electrical, the diagnosis and fix are different from rotary tool motor overheating.
Friction & Lubrication Issues
Most flex shaft overheating problems originate from friction inside the cable assembly. Unlike the rotary tool motor, the flex shaft relies on a spinning inner cable rotating at high RPM within a flexible outer sheath. If lubrication is insufficient, excessive, or unevenly distributed, internal resistance increases and heat builds rapidly along the cable or in the handpiece. In the following sections, we’ll examine how under-greasing and over-greasing both create overheating—just through different mechanical mechanisms.
1. Not greased
If your flex shaft is running hot, one of the most common causes is insufficient lubrication inside the cable assembly. The inner drive cable spins at extremely high RPM—often the same speed as the rotary tool itself. Without proper grease, the metal cable rubs directly against the inner lining of the sheath, creating friction. To the user, this may show up as a warm or hot cable after a short period of use, a slightly rough feel while operating, or a faint squeaking or dragging sound.
From a physics standpoint, the rotating cable experiences continuous sliding contact against the outer sleeve. Without lubrication, the coefficient of friction increases significantly. Since RPM is high, even moderate friction produces noticeable heat. Instead of transmitting rotational energy efficiently to the handpiece, some of that energy converts directly into heat along the cable length.
To confirm this issue, disconnect the flex shaft, pull out the inner cable, and inspect it. If it appears dry, lightly polished from friction, or lacking a visible grease film, lubrication is likely insufficient. You may also feel resistance when rotating the inner cable manually.
The fix is to apply a thin, even layer of appropriate grease (such as white lithium or quality bearing grease) along the cable before reinserting it. Avoid oil, as it is too thin and will not provide lasting lubrication. Proper greasing restores smooth rotation, reduces internal friction, and significantly lowers operating temperature.
2. Over-greased
While lack of lubrication causes friction, excessive grease can also lead to flex shaft overheating. If too much grease is applied to the inner cable, it does not simply make things smoother. Instead, the thick grease creates viscous drag as the cable spins at high RPM inside the sheath.
Scientifically speaking, grease is a viscous medium. When the inner cable rotates rapidly, it must shear through the grease layer. The thicker and heavier the grease layer, the greater the internal resistance. This viscous shear force increases torque demand on the motor and generates heat within the cable assembly. At high rotational speeds, even small increases in drag can produce noticeable temperature rise. In addition, excess grease can migrate toward the handpiece bearings, further increasing friction.
To confirm over-greasing, remove the inner cable and inspect it. If grease is heavily packed, clumped, or squeezing out during operation, it is likely excessive. You may also notice grease leaking near the handpiece connection.
The fix is simple. Wipe off excess grease and leave only a thin, uniform coating along the cable. The goal is lubrication — not packing. A light, even layer provides sufficient friction reduction without introducing viscous drag, allowing the flex shaft to run cooler and more efficiently.
Mechanical Alignment Issues
Not all flex shaft overheating is caused by lubrication problems. In some cases, the issue arises from mechanical misalignment within the drive system. Because the flex shaft transmits torque through a rotating inner cable, proper alignment between the rotary tool, the cable core, and the handpiece is essential.
If the cable is sharply bent, loosely connected, or improperly seated, internal friction increases and heat develops—even when lubrication is correct. The following sections examine the most common alignment-related causes and how to diagnose them.
1. Too many bends
A flex shaft is designed to be flexible—but not sharply curved or tightly coiled during operation. When the cable is forced into multiple tight bends, loops or sharp angles, internal resistance increases significantly. Many users assume flexibility means bend it any way you like, but excessive curvature directly increases heat generation.
Scientifically speaking, the rotating inner cable presses harder against the inner wall of the outer sheath at bend points. The sharper the bend radius, the greater the radial (sideways) force between the cable and its sleeve. Friction force is proportional to normal force, so tighter bends increase friction dramatically. Since the shaft operates at high RPM, even small increases in friction translate into noticeable heat. In addition, torsional stress concentrates at bend points, reducing rotational efficiency and converting more mechanical energy into heat instead of useful work.
To confirm this issue, straighten the flex shaft as much as possible and operate the tool briefly under light load. If the overheating reduces noticeably when the cable has a gentle curve instead of sharp bends, excessive bending was the cause. You can also feel along the cable during operation (carefully) to identify localized hot spots at tight curves.
The fix is simple. It is to maintain broad, gentle curves and avoid tight loops and bends. Keep the rotary tool suspended above your workspace so the cable hangs naturally with a gradual arc. A larger bend radius reduces internal friction and allows the flex shaft to run cooler and more efficiently.
2. Loose collet connection
A loose connection between the rotary tool and the flex shaft can also cause overheating, although it’s less obvious than lubrication or bend-related issues. If the flex shaft coupling nut is not fully tightened onto the rotary tool housing — or if the inner cable is not properly seated into the motor’s collet—the drive connection can slip slightly under load.
Scientifically, a loose interface introduces micro-slippage between rotating components. Instead of transferring torque cleanly from the motor shaft to the flex cable, small gaps allow momentary disengagement and re-engagement under load. This creates impact forces, vibration, and localized friction at the coupling point. That energy, which should be transmitted smoothly as rotation, is partially converted into heat. Over time, this can warm the front of the tool and the flex shaft connector area.
To confirm, unplug the tool and inspect the connection. Ensure the flex shaft coupling nut is firmly tightened and that the inner cable is fully inserted into the collet before tightening. If the cable tip shows rounding or wear, it may not be seating properly. After reassembly, run the tool briefly with no load — if vibration and heat decrease, the loose connection was the culprit.
3. Handpiece bearing wear
If your flex shaft overheats primarily at the handpiece—not along the cable—the small internal bearings may be worn. Over time, these bearings experience continuous high-RPM rotation, and once they begin to degrade, they create resistance instead of smooth support.
To confirm bearing wear, disconnect the flex shaft from the rotary tool and manually rotate the handpiece spindle. It should spin smoothly and quietly without the slightest feel of any resistance. Even a slight feeling of grinding, resistance, or side-to-side play indicates worn bearings. The issue may seem trivial, however, when that bearing rotates at 30,000 RPM, such small defects produce heat. The resolution will involve replacement of handpiece bearing.
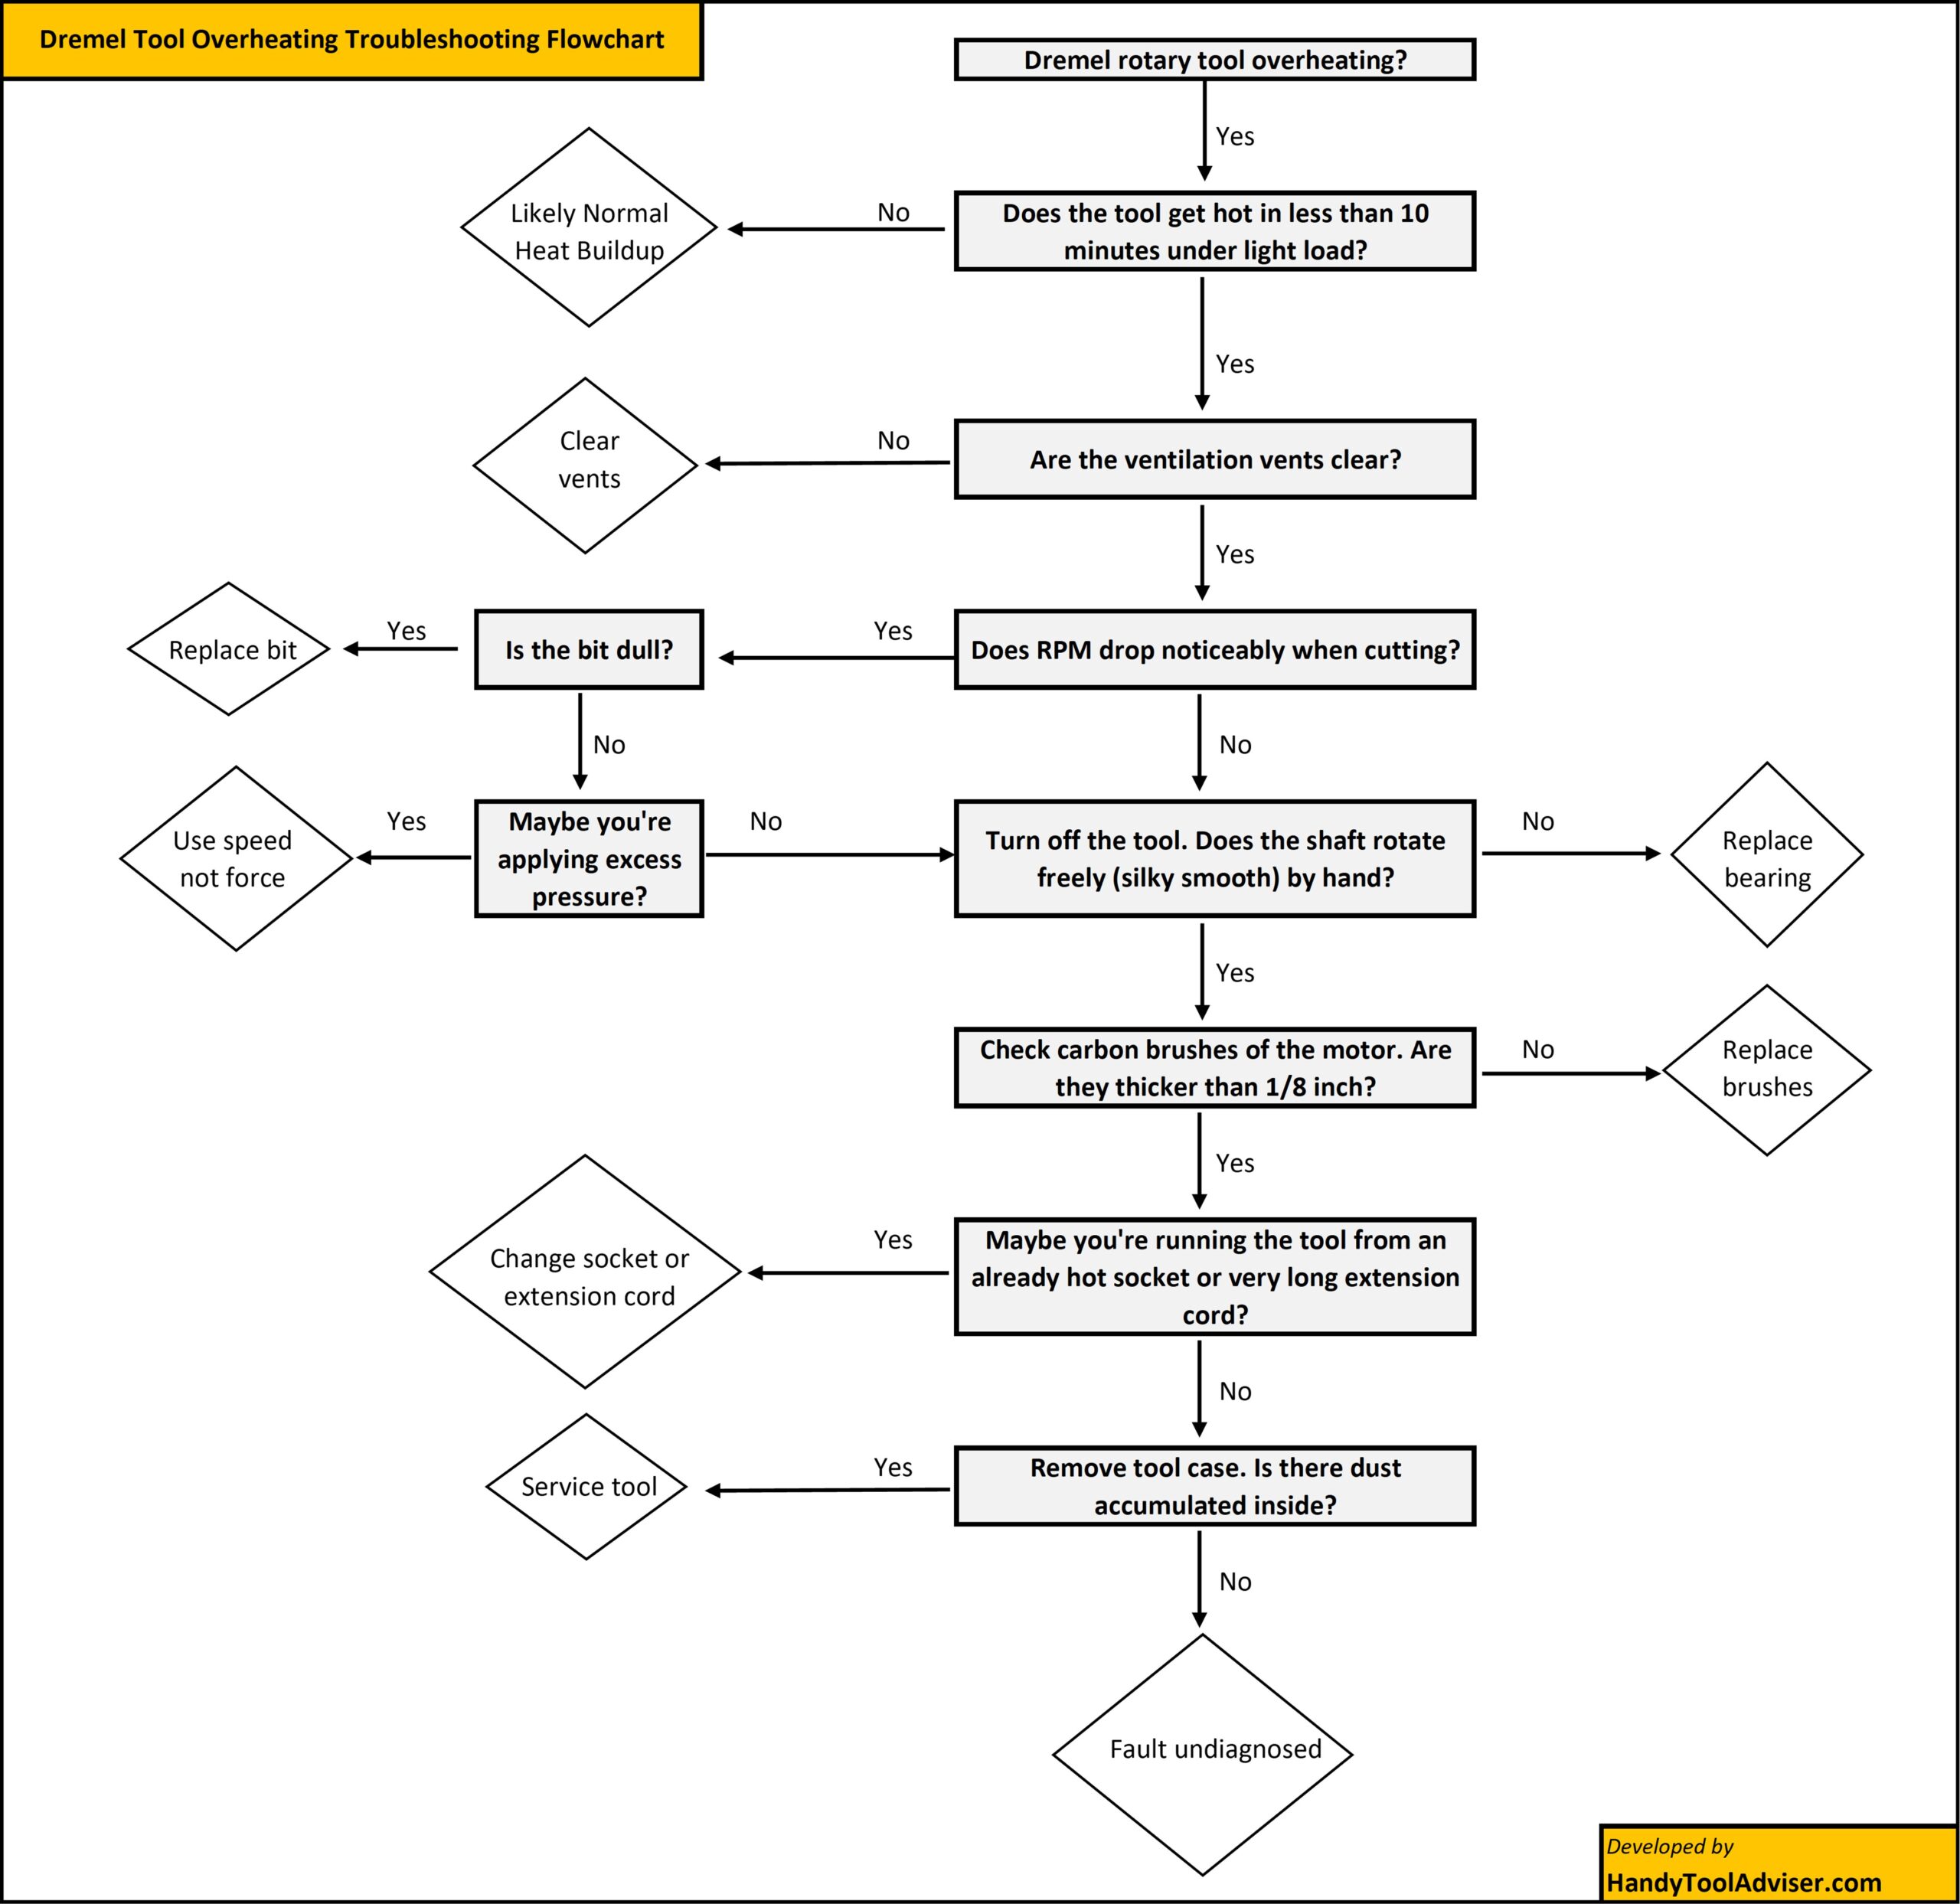
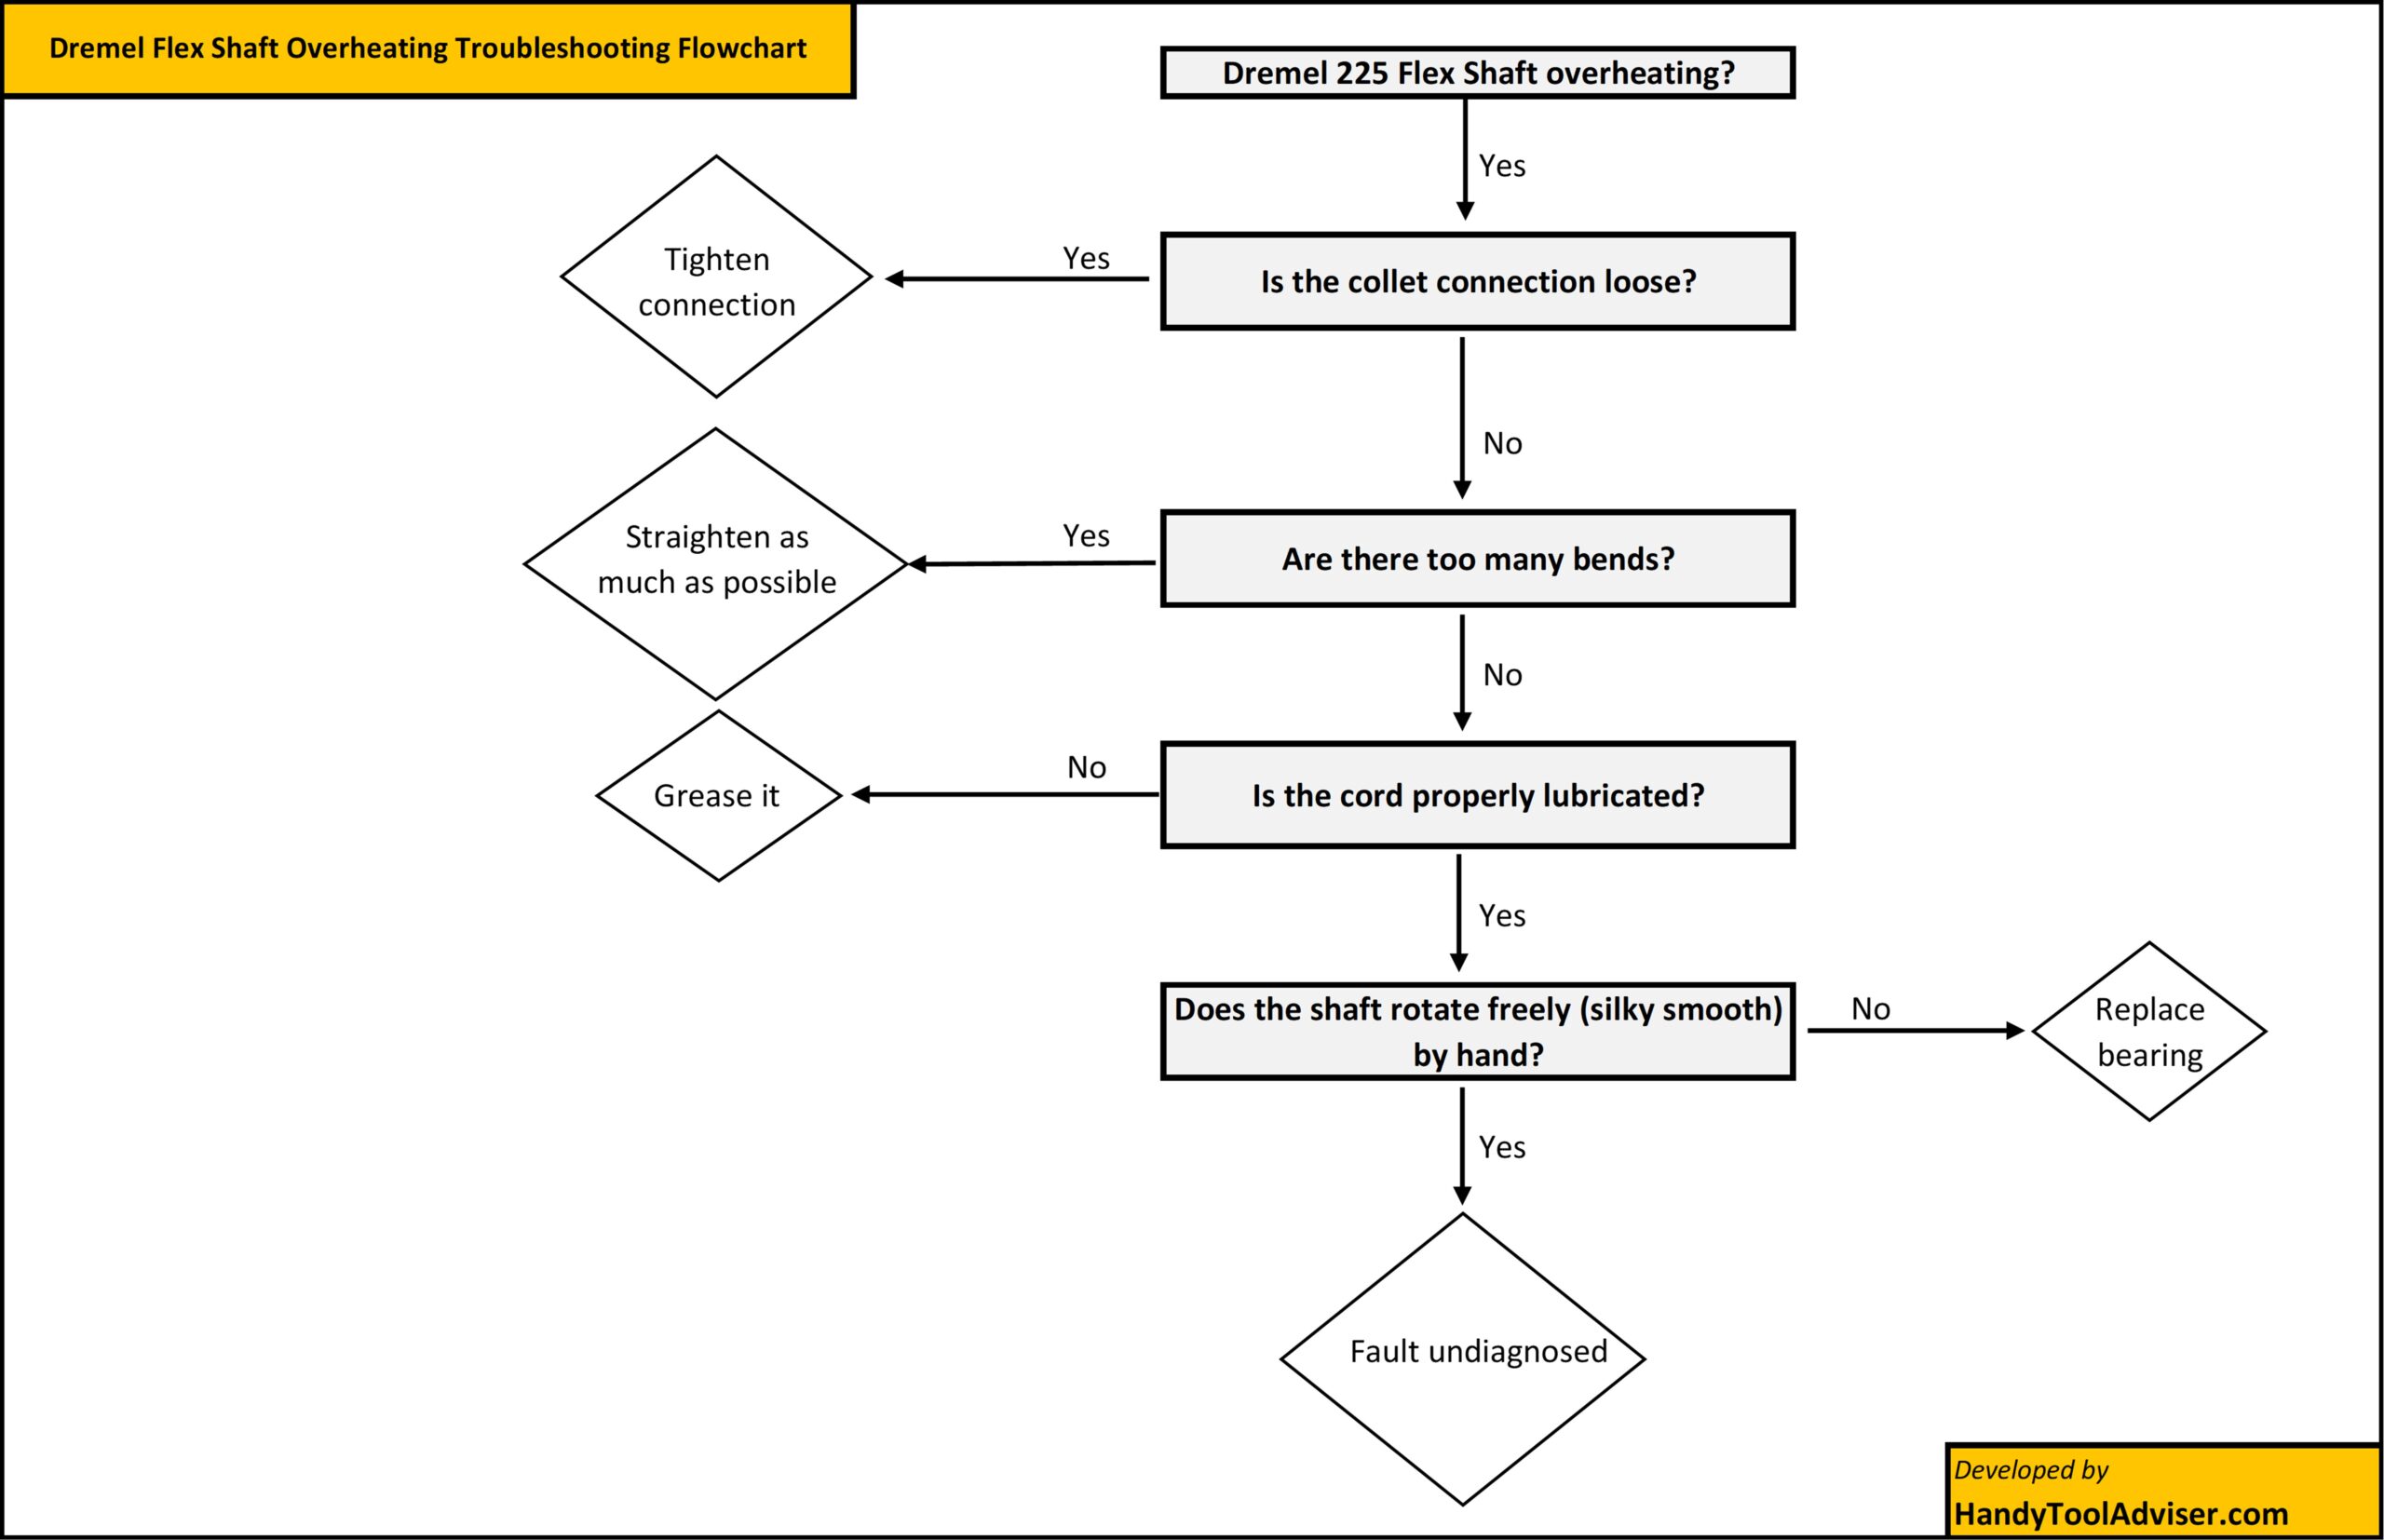
Step-by-Step Troubleshooting Flowchart
Let us present a simple-to-understand flowchart to be used for diagnosing the cause of your Dremel overheating.
For Dremel Rotary Tool
For Dremel 225 Flexible Shaft
When Overheating Means Permanent Damage
A Dremel running warm is normal. However, a Dremel that is too hot to touch, smells like burning, smokes, or shuts off repeatedly is not. At that stage, overheating (due to whatever reason left unchecked) may have already damaged internal parts rather than just signaling a temporary issue.
Signs the Motor May Be Permanently Damaged:
- Strong burning or electrical smell
- Tool loses power even at high speed settings
- Sparks visible through ventilation slots (beyond light, normal brush sparking)
- Tool overheats again quickly after cooling down
When internal motor windings overheat, their insulation can break down. Once that happens, the motor draws more current, runs less efficiently, and generates even more heat. This cycle usually means the motor won’t fully recover.
Signs the Flex Shaft May Be Permanently Damaged:
- Heat concentrated at the handpiece tip
- Grinding noise or vibration that doesn’t improve with lubrication
- Inner cable feels rough or uneven when rotated by hand
- Persistent burnt smell from the shaft assembly
Repeated overheating can harden internal liners, degrade bearings, or weaken the cable core. If lubrication and alignment fixes don’t solve the issue, replacing the cable or handpiece is often the practical solution.
The bottom line:
If you’ve already addressed pressure, speed, ventilation, brushes, lubrication, and alignment—and the tool still overheats quickly—you may be dealing with permanent damage to your Dremel tool or the flex shaft.
How to Prevent Overheating (Maintenance Schedule)
It is better to follow some simple habits while using the Dremel tool to reduce probability of overheating altogether. Preventing overheating is much easier than fixing damage after it occurs.
A simple maintenance routine can keep both your rotary tool and flex shaft running cooler, extend their lifespan, and ensure consistent performance. Regular checks and care help you avoid both mechanical and electrical causes of heat buildup. Here’s a practical schedule to follow:
- Every Use:
- Keep vents clear of dust and debris.
- Avoid covering vents with fingers or resting the tool against surfaces.
- Use the correct speed and apply light pressure; let the tool do the work.
- Check flex shaft routing: maintain gentle curves, avoid tight bends.
- Every 30 Hours of Use:
- Inspect and clean motor brushes; replace if carbon is shorter than 1/8 inch.
- Check accessories for dullness and replace worn bits or wheels.
- Every 50–100 Hours of Use:
- Perform a thorough cleaning of the tool housing and flex shaft (if applicable).
- Inspect bearings and handpiece for wear or unusual friction.
- Re-grease the flex shaft inner cable lightly; avoid over-greasing.
- Ongoing:
- Avoid long or thin extension cords; use appropriately rated wire gauge.
- Ensure wall sockets are in good condition and not recently overheated by other devices.
- Take breaks during prolonged use to allow the motor to cool naturally.
Following this schedule consistently will prevent most common overheating issues and keep your Dremel performing safely and efficiently.
Other article suggestions