How to sharpen a chainsaw with a Dremel tool?
[A step-by-step guide]
Affiliate disclosure: Handy Tool Adviser is reader supported. When you buy through our links, we receive a small commission at no additional cost to you.
In this article, we explain the step-by-step process of sharpening a chainsaw using a Dremel tool. Homeowners and DIY users can use this guide for sharpening their chainsaws. This guide works well for occassional maintenance.
Step 01: Get a chainsaw sharpening attachment
In order to begin, you need to have the special attachment made by Dremel for sharpening the chainsaw. It is called the Dremel 1453 chainsaw sharpening attachment (check price on Amazon here). This attachment comes in the form of a small kit as shown in the picture below.
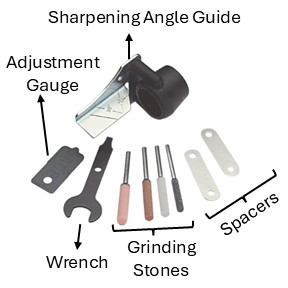
This kit has the following main components:
- Four grinding stones of different sizes: At a time, you are supposed to use any one grinding stone of your choice for sharpening the chainsaw (we’ll explain how to choose the right stone in the next step). The stone does the actual work of sharpening.
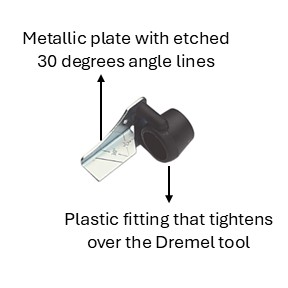
- A sharpening angle guide with 30-degree angle lines etched into it for assisting with the correct sharpening angle (will be explained later)
- An adjustment gauge
- A small wrench (for tightening the grinding stone over the Dremel tool’s chuck)
- Two spacers that are installed in the angle guide (when, why and which spacers are used will be explained later)
Step 02: Select the right size of the grinding stone
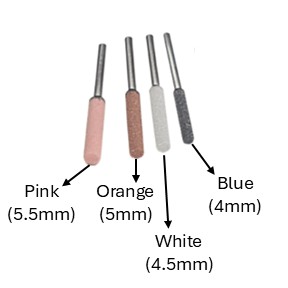
- The smallest is the blue color grinding stone with 4.0 mm diameter (Dremel article no. 453)
- Next is the white color grinding stone with 4.5 mm diameter (Dremel article no. 457)
- Then we have the orange color grinding stone with 5.0 mm diameter (Dremel article no. 454)
- Finally, the largest grinding stone included in the kit is the pink color grinding stone with 5.5 mm diameter (Dremel article no. 455)
There are four grinding stone sizes in the kit as given below:
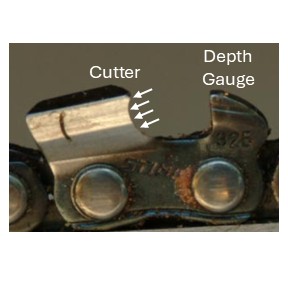
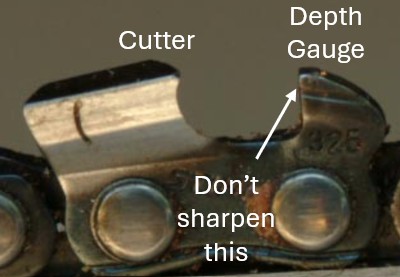
In order to pick the right size of the grinding stone, you need to understand the simple anatomy of the chainsaw cutting link. If you look closely at the chain of the chainsaw, you'll see not all of its links cut. There are specific links that cut. These links have a cutter and a depth gauge as shown in the picture below.
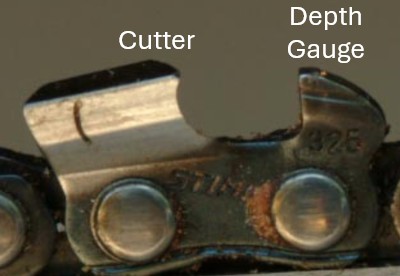
The cutter is the part responsible for chipping off the wood when you use a chainsaw. It is the cutter that gets dull and needs to be sharpened. The depth gauge determines how large a bite the cutter is allowed to take from the wood. You don't sharpen the depth gauge. You sharpen the cutter.
The correct grinding stone size depends on the type of chain installed on your chainsaw and the size of its cutters.
Follow and repeat these simple steps for selecting the right size of the grinding stone:
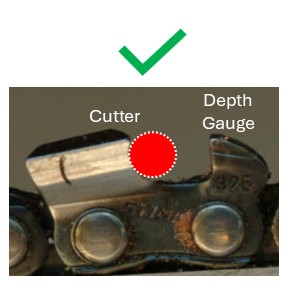
1. Just pick any grinding stone and place it in the cutter of the chainsaw in the area shown in below picture.
2. The circular periphery of the grinding stone is supposed to fit only in the cutting edge of the cutter as shown in the picture below.
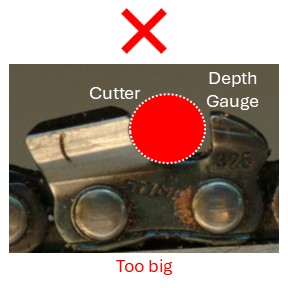
3. If the grinding stone you picked is filling up more than just the cutting edge, you've picked larger-than-needed stone. Pick one size smaller stone.
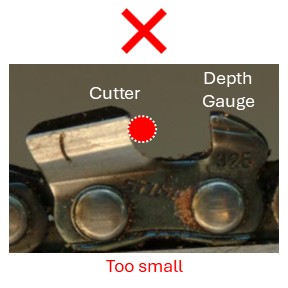
4. If the grinding stone you picked is not even fully covering the curve of the cutting edge, you've picked a stone that is too small. Pick one size larger stone.
Once you’ve selected the right size of the grinding stone, install it in the chuck of the Dremel tool and tighten with the wrench given in the kit.
Step 03: Assemble the remaining pieces of the sharpening attachment kit
When the grinding stone has been installed, assemble the remaining pieces using the following steps:
Assembling the sharpening angle guide:
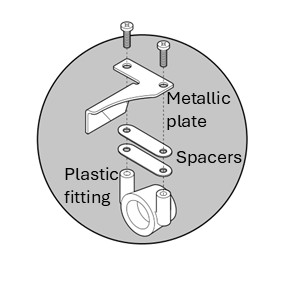
The sharpening angle guide comes in two pieces that have to be assembled together. These include the metallic plate having 30-degree angle lines etched over it and the plastic fitting that tightens over the Dremel tool.
These two pieces have to be assembled together using screws. Spacers have to be placed between them (only if needed - explained below).
When to use the spacers?
When to use the spacers is explained below:
1. No spacer needs to be used if you’re using the smallest grinding stone (4 mm size/blue color).
2. If you’re using the white color grinding stone (4.5 mm) or the orange color grinding stone (5 mm), a single spacer is to be used. Without this spacer, the grinding stone will start grinding the sharpening guide instead of the chainsaw. The spacer creates clearance between the stone and the guide.
3. If you’re using the largest grinding stone (5.5 mm/pink color), both of the spacers in the kit are to be used. The reason is similar as above i.e., to create clearance between the stone and guide and prevent the stone from grinding the guide instead of the chainsaw.
Once the sharpening angle guide has been assembled, it can be tightened over the Dremel tool. The guide and the gauge surround the grinding stone. Their purpose will become clear in the next step when we explain how to use the tool for sharpening the chainsaw.
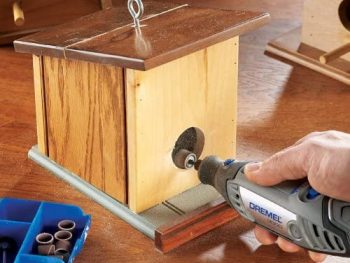
Step 04: Sharpen the chainsaw
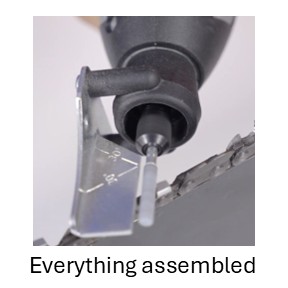
Once the Dremel chainsaw sharpening attachment has been assembled over the tool, you can begin sharpening the chainsaw.
Before beginning:
- Properly secure your chainsaw bar
- Wear safety gloves and eye protection
- Remove the spark plug wire in your chainsaw (or disconnect the battery if it is an electric chainsaw)
The cutting chain of the chainsaw has cutters over it that actually do the cutting (as the chain itself is simply like a normal bicycle chain in design and can’t do any cutting). The sharpening process is based on using the Dremel tool’s grinding stone to individually sharpen each cutter.
How to properly align the grinding stone with the cutter?
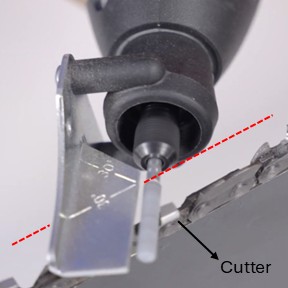
The most important aspect of sharpening a chainsaw with a Dremel tool is to understand how to grind the chainsaw cutter at the correct angle. For this purpose, there are two etched lines over the guide at 30-degree angle. You have to keep one etched line parallel with the chain of the chainsaw while grinding the cutter (as shown in the picture below).
Speed is important!
The recommended speed of the Dremel tool during the sharpening process is 15,000 - 20,000 RPM. Lower speeds have the tendency to cause bumps and vibrations during grinding while higher speeds can overheat the cutters of the chainsaw.
This is how you sharpen a single cutter of the chainsaw. Sharpening the entire chainsaw is simply sharpening all of its cutters.
Follow the following steps to sharpen the entire chainsaw:
1. Before you start, use a marker to mark the cutter from which you are starting the sharpening process. Otherwise, you won’t be able to tell when you’ve sharpened the complete chain (and you may end up sharpening already sharpened cutters).
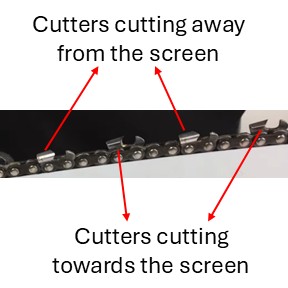
2. The cutting chain of the chainsaw is designed such that one cutter has its cutting edge on the right side while the next cutter has its cutting edge on the left side (as illustrated in below picture).
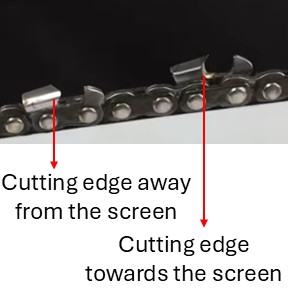
This alternating pattern repeats itself over the entire length of the chain of the chainsaw (as illustrated in the image below).
3. Start with the first cutter. Place the grinding stone next to the cutter’s cutting edge and use the adjustment gauge to ensure you angle the grinding stone correctly with respect to the cutter. Turn on the Dremel tool and grind the cutting edge using a few back and forth motions. There is no fixed number of passes; just apply light, controlled strokes.
4. Move on to the next cutter. However, remember that the very next cutter will have its cutting edge on the other side. Therefore, you will have to rotate your hand (and the Dremel tool) to the other side.
5. It can be a little inconvenient to keep rotating your hand (and the Dremel tool) from one side to the other as you move on from cutter to cutter. A simpler way is to sharpen all cutters of one side and then move on to the next. For doing this, you will sharpen one cutter then sharpen the third then sharpen the fifth and so on.
6. Once one side is completely sharpened, repeat the process for the other side.
Avoid these mistakes
Avoid the following common mistakes when using a Dremel tool to sharpen your chainsaw:
1. Don't sharpen the depth gauge. Only sharpen the cutter.
2. Adjust the height of the depth gauge if needed. The tip of the depth gauge is supposed to remain slightly lower than the cutter tip (typically 0.025 inches or 0.65 mm is the industry standard) as illustrated in the picture below.
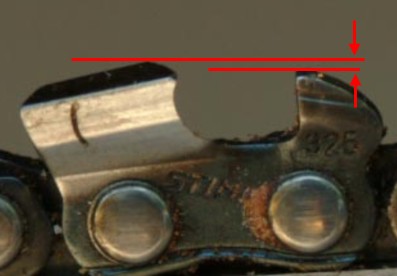
If you've been sharpening your cutter for quite a while now, it is possible that the cutter tip has reached the same level as the depth gauge. If this has happened, you need to use the adjustment gauge/raker gauge to file down the depth gauge otherwise your chainsaw won't cut better after sharpening.
It is because the above shown clearance decides the size of bite each cutter of the chainsaw will take from the wood. Zero clearance between the cutter and the depth gauge means zero bite size i.e., no cutting.
We don't recommend using the adjustment gauge that comes with this Dremel kit for working on your depth gauge because it is not as accurate and reliable as it needs to be. We recommend using a standard raker gauge and file (like this kit from Oregon) for grinding down your depth gauge.
We recommend you check and work on your depth gauges at least every third time you sharpen your chainsaw.
Frequently Asked Questions
Is a Dremel tool better than a round file for sharpening a chainsaw?
A Dremel tool is faster and more convenient for an average user (like a homeowner or DIY user) compared to a round file. It helps maintain a consistent sharpening angle by the angle guide. A round file, on the other hand, provides more control and is often preferred by professionals for precision sharpening.
Can sharpening a chainsaw with a Dremel tool damage the chain?
Yes, improper use can damage the chain. Applying excessive pressure or using very high RPM can overheat the cutters and reduce their lifespan. Using light pressure and keeping the Dremel speed within the recommended range helps prevent damage.
How many times can a chainsaw chain be sharpened?
A chainsaw chain can be sharpened until the cutters reach the wear marks specified by the manufacturer. Once the cutters are worn beyond these marks, the chain should be replaced.
Should the depth gauges be adjusted every time the chainsaw is sharpened?
No. Depth gauges do not need adjustment after every sharpening. In most cases, they are checked and adjusted after every two to three sharpening sessions, depending on how much material has been removed from the cutters.
Why does a chainsaw still not cut properly after sharpening?
Poor cutting performance after sharpening is usually caused by incorrectly set depth gauges, uneven sharpening angles, or heavily worn cutters. Even sharp cutters will not cut effectively if the depth gauges are too high.
What Dremel speed should be used for sharpening a chainsaw?
A Dremel speed in the range of 15,000 to 20,000 RPM is recommended. Lower speeds can cause uneven grinding, while higher speeds can overheat the cutters.
Is it safe to sharpen a chainsaw without removing the chain?
Yes, sharpening can be done with the chain installed, provided the chainsaw bar is properly secured and the spark plug wire (or battery, in the case of electric chainsaws) is disconnected to prevent accidental starting.
Related Articles

Other suggested articles